I started constructing my model of the Coal Banks Coulee bridge model with the abutments and tower support piers. The size and nature of these components would determine the positioning and placement of the entire model and so it was important to complete these first. When I started I was not too sure if I could produce scratch castings as good as the commercial products but I did not really like anything on the market. I gleaned a few ideas from C.C Crow and his website on Hydrocal casting and developed a few tricks of my own. In the end the castings turned out very nice and match prototype practice on the GN very closely.
Prototype References & Design
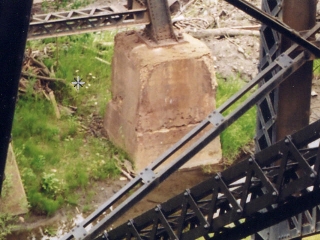
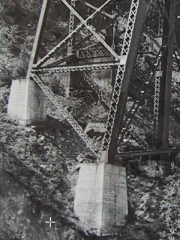
GN Bridge trestle tower footings varied from cut stone to cast concrete, depending on the materials available and the era of construction. This example is the Midvale Creek bridge near East Glacier
I designed my abutments and piers based upon photos from several GN prototypes. The concrete forms used in the first half of the century were built up from smaller boards resulting in small lines in the concrete. This is typical of concrete pours in the first half of the century prior to the development of plywood. The other things to note in these photo is that the concrete can become pretty chewed up. Turns out, this is a good thing and minor defect in the casting process always seemed to occur and its OK because as you can see, it happens in the prototype also.
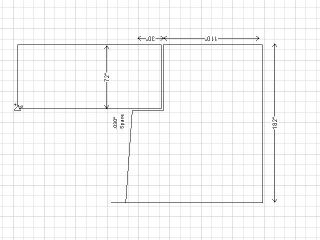
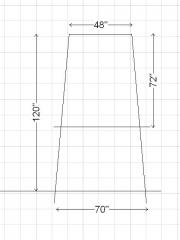
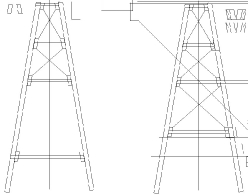
These sketches show the approximate dimensions for the abutments and trestle foundation piers. Note that 72″ piers were used on most of the model but a taller version was used on one of the towers to add variety that was found in the prototype.
Form Construction
Add picture of pier form<<<<
The form lines is an important characteristic in the prototype I wanted to model. I considered scribing plastic sheet material but instead opted to build forms from individual strips of plastic just like the real thing. I used .125″ styrene material and stacked it on edge to create form sides.
Constructing forms in with styrene strips of course creates a very stiff mold that may be difficult to remove a dried casting from. I built my forms to split apart so the dry casting can easily be removed..
Add photo of abutment form<<<<<<<<<<<<
Casting Process
Hydrocal brand casting plaster is a commonly used material used for commercial plaster castings. This product is made by US Gypsum Corp. and is only sold in 100 pound bags. I did not want to have to buy such a huge amount of material so I elected to use Woodland Scenics Lightweight Hydrocal. This is a Hydrocal based product but has some kind of additive that makes it half the weight of real Hydrocal. I found this product to work for my castings and I can buy it in 1/2 gallon containers, albeit a lot more expensive per pound. I did dicsover later, however, that this material does not seem as strong as real Hydrocal and this would later cause me some problems. If you can get real Hydrocal, do so. I think you will be happier.
I prepared my form for the pour by starting with a thorough cleaning. I scrubbed the forms between castings with an old toothbrush. After completely drying them, I assembled the form halves with rubber bands as appropriate. I then gave the inside of the form a very light shot of Pam cooking spray. I used a cotton swab to spread the spray around the form making sure the corners get coated and removed excess.
I mixed the Woodland Scenics Hydrocal exactly as the manufacturer’s instructions indicated. You don’t need to rush but you really only have about 5 of minutes of working time so don’t mix until you are really ready.
Bubbles are a problem with plaster casting and will leave defects that do not look like the wear and tear defects we see in the prototype.. CC Crow recommends tapping the table to cause the bubbles to float to the top. This seemed to work OK but I developed an even better trick of using a small personal vibrator to drive the bubbles from the pour. I pour only about half the mold volume and then I take the vibrator to the outside of the form and vibrate for 15-20 seconds until the top surface of the pour was full of bubbles – sort of like when you cook pancakes. Then I poured the rest to fill the mold to the top and slightly more. Again I apply the vibrator to the outside of the mold and drive the bubble to the top.
I then let the pour sit for maybe five minutes until the plaster starts to get a little stiff. At this time I take either a stick or a razor blade and trim off the excess material. Ideally the pour is smooth with the top of the mold so we have a fairly square surface that we will not need to clean up very much. For tower piers, the top of the casting becomes the bottom and of course we would really like this to be square without having to sand it.
The plaster is pretty hard after 30-45 minutes and can be removed from the forms and set aside to dry completely in a couple of hours. Make several more than you need as each one has a character and takes the coloring differently so make extra so you can have some choices on what to actually use.
Finishing the Castings
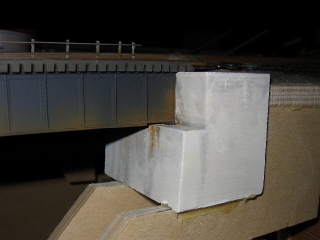
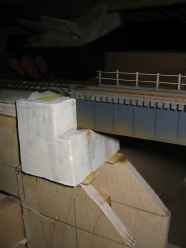
Here is a finished abutment. It has been washed with Woodland Scenics concrete color wash which helps the form lines to show up.
I stained the castings with Woodland Scenics Concrete coloring for an initial base color. I streaked the casting in horizontal layers to simulate the color differences in partial pours. After the piers are installed, additional weathering and color will be added. Be careful to avoided getting skin oils on your castings before staining. I ran into some odd coloration patterns in some areas and was suspicious foreign material was to blame. I actually rubbed the stain in on some of the pieces to get the color to look right.
Coal Banks Bridge Project
This is the second in a series on my model of the Coal Banks trestle. Below is a listing of all the installments:
- Coal Banks Trestle: Final Assembly (January 4, 2010)
- Coal Banks Trestle: Towers (January 4, 2010)
- Coal Banks Trestle: Abutments & Piers (January 3, 2010)
Next: Bridge Benchwork
